Wednesday, March 29, 2017

Space Hulk WIP Blood


Space hulk is about horror, so as I started adding layers of weathering, I paused to add some blood. I think the carnage looks pretty cool. In my imagination, the guys boarding the hulk would be entering a crime scene of sorts.  I am so grateful all of the doors are done. Those were tedious.

Tuesday, March 28, 2017

Space Hulk WIP 3


The space hulk is getting close to completion, but even in this state there is a lot of work to do. Many of the panels are not glued on yet, which will take quite a while due to the vast quantity of them. The doors need to be completed, and all of the grey exterior panels need to be filled and painted. Fortunately that is the easy stuff. Rather than make this easy on myself, I ordered another batch of this stuff before I had completed the first batch. I'd really like to paint a miniature at this point, but I must keep plugging away.

Saturday, March 18, 2017

Space Hulk Big Room WIP


 I decided to tackle one of the large rooms today and see what I could do with it. The goal here was to improve the process that will let me complete all zillion pieces of this puzzle in a reasonable amount of time. This time around I used Vallejo yellow for the vertical wall sections, sealed with semi-gloss. The hope was that it would make it easier to remove the enamel wash. I like the results, but the process is marginal. A helpful hint from Marc Raley was to paint this quickly, so rather than use a brush to paint the chips on the door, I just blasted all the chips on using a bit of foam. I think once the streaking is on it looks just as good. I only have 20 more of these doors to paint.

So does this look weirdly 2d to you as well? I can't shake the feeling that I am looking at a comic book.

-john


Friday, March 17, 2017

Space Hulk Corridors WIP


Mordian7th, was extremely generous in sending me his already assembled Fantasy Arc space hulk scenery. I'll plug Fantasy Arc here. I am really pleased with this terrain. I think they did a phenomenal job. I went so far as to go online and order a lot their new stuff to add some fun Aliens-esque rooms to this.

With scenery in hand, I had to figure out a way to paint mostly assembled pieces. I settled on some Krylon spray paints, and figured an enamel pin wash would work to highlight the detail. I'm reasonably pleased with this color scheme, and the level of effort to lay down these base colors. It will take a few weeks to get all of this painted to the base coat level, but if I can slog through it, I think it will be a really fun Zone Mortalis table to play on.

Wednesday, March 8, 2017

Soviet T-28 Post Oils WIP 2


Instead of using enamels on this tank, I decided to give oils a try. I'm very pleased with the results. If you look closely you should be able to see where I used blue oil paint to shade parts of the turret. Now imagine the green a fair bit darker, with blues in the shadows and light green only on the edges. Anything I happened to paint black would use blue, but this time for highlights.

Dark Angles. That is what is next.

Tuesday, March 7, 2017

Pre-Shading Soviet T-28 Tank & Print Line Removal


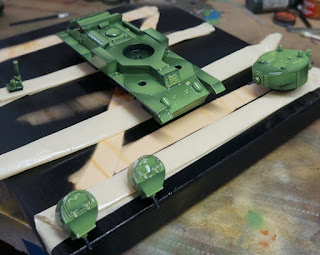
I've been in a mood to play with oils, so I needed another canvas. What you see here is a Trenchworx T-28 soviet tank from WW2. These guys were used in the early part of the war and were basically land battleships. This thing is bristling with machine guns. The model is really nice, but it has some remnants of its 3D printed past in the form of stepping lines. Those lines will wreck my use of oils, enamels, and washes, so they must be dealt with.  The first step in removing them is putting on a very solid base coat. Normally I let the black shade some of the model. I couldn't do that here, because to remove the stepping lines I have to spray a heavy coat of gloss varnish. Varnish has the tendency to crack the layer of paint underneath it, so I needed that base layer to be extra durable.  After two sprays of varnish, the self leveling properties of the lacquer showed good results. The tank is smooth. Now it is ready for transfers........in 8 hours after the lacquer cures. After that I will spray on some chipping medium and spray on some white designs.

Why this sudden interest in green? I am starting a new 40k/30k project, and wanted to practice blending purples into green. So what am I painting? :)